1.1
Copyright © 2000, 2007 Liferay Inc.
| Revision History | |
|---|---|
| Revision 1.0 | December 20th, 2006 |
Table of Contents
Intended audience. This document will give an in depth tutorial of the CMS (Content Management System) within Liferay portal. The intended audience of this document is for users who determine the content that is displayed and published on their portal. Distinct roles for specific users are provided in the introduction.
Liferay version. This guide has been written for Liferay 4. Some details might be different for previous versions. Do not expect it to be accurate for older versions. It is assumed that Liferay has been installed and accessible through the web interface.
Related documents. If this is not what you are looking for consider the following related documents
Liferay Portal 4 - Installation Guide
Liferay Portal 4 - Customization Guide
Liferay Portal 4 - Portal Administration Guide
More information and support. If you are looking for help for a specific issue we invite you to use our community forums: http://www.liferay.com/web/guest/devzone/forums to ask your questions. We also offer professional support services (support@liferay.com) where your company will be assigned a Liferay developer ensuring your questions are answered promptly so that your project is never compromised. Purchased support always gets first priority. This business model allows us to build a company that can contribute a great portal to the open source community. If your company uses Liferay, please consider purchasing support. Liferay has an extremely liberal license model (MIT, very similar to Apache and BSD), which means you can rebundle Liferay, rename it, and sell it under your name. We believe free means you can do whatever you want with it.
Table of Contents
Liferay Portal provides out-of-the-box CMS functionality in two major areas: document management (repositories for documents and images) and publishing.
Document management is provided through Liferay's Document Library and Image Gallery portlets. These portlets provide intuitive management of Microsoft Office documents, PDFs, text files, and images.
Publishing in Liferay Portal is accomplished through Liferay's Journal portlet. It features a clean separation between content (data entry) and presentation (layout design). This allows the content to conform to a consistent "look and feel." Additionally, the Journal portlet provides a content versioning and approval paradigm (workflow). This system allows for users involved in publishing to fall naturally into three different roles:
Writers create, edit, and enter content comprised of text and images
Designers create layouts that display content
Editors edit and approve final output and release it for publication to the portal
As an example, consider our website. All of the static content is managed and published by the Journal portlet. We can authorize other members of the Liferay community to write documentation, but we retain final editorial authority and security. This also allows for a mixture of portlets and Journal articles to coexist, enabling the designer to be more creative with what is displayed. Designers can integrate static content using the Journal Content portlet with a number of other function-rich portlets (e.g. Navigation and Breadcrumb). All of this shows how useful and flexible publishing can be with the Journal portlet.
Table of Contents
The Document Library provides a centralized repository for various document types (e.g., .PDF, .DOC, .XLS, etc.) to be stored and assigns a unique URL to each of them. A company's intranet running Liferay Portal can then be able to post internal documentation (e.g., reimbursement forms, charitable donations policies, etc.) for access by its employees. Alternatively, since each document has its own URL, a portlet on your company's public website may display a list of PDF files of quarterly newsletters and their download links:

The Document Library supports multiple repositories that can be set with different access roles. Also, the documents in the repository are version-controlled, allowing a user to retrieve any particular revision that has been stored on the system.
To add a document to an empty Document Library portlet, you must first add a folder. Click the Add Folder button.

Give a name and description to the folder. The permissions for the folder determine what users can do. This is further explained in Liferay Portal 4 - Portal Administration Guide. Click Save. The Document Library screen will appear.
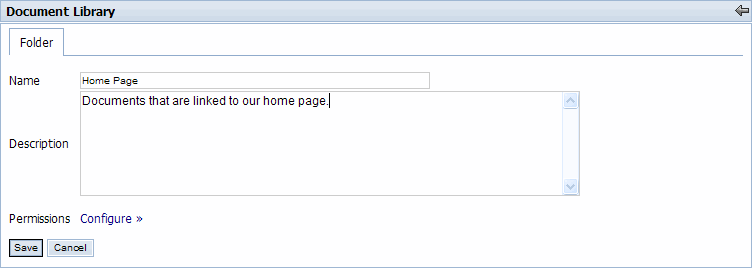
The new folder will appear in the Document Library. To add a document to that folder, click on the folder name.

You can either add more folders to further divide your documents into more specific categories or you can add a document to the current folder. The breadcrumb (see section 5.1.) at the top of the portlet shows that you would be adding a document to the Home Page folder. In this use case, we will add a document. Click Add Document.

Use the Browse button to find the document you want to upload to the Document Library. There is a cap of 300k on uploaded documents. After uploading the document, enter a title and description for the document. Click Save when finished. After saving, you can choose to lock the document to prevent anyone from editing this document. The default lock time is one day.

Use the breadcrumb to return to the Home Page folder (for this use case) where you will see the document you have just added. Clicking on the document will allow you to open or save it. If you have the proper permissions, you can delete the document from the Document Library by clicking the Delete icon (
 ).
).
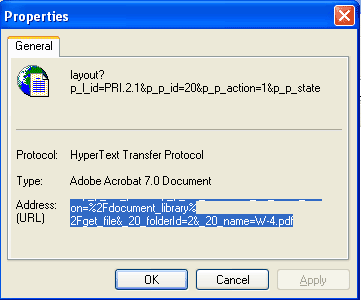
To reference a document in the Document Library, you must first find which folder the document is contained in. Using the same use case as in 2.1.1, we see that the W-4.pdf document is located in the Home Page folder, as shown by the breadcrumb.

Right click on the document name, then select Properties to view its Address (URL). You can then either highlight the entire URL or click anywhere over the URL area and press Ctrl+A to select the entire link. Keep in mind that the URL is long. If you use the highlight method, you must hightlight the entire URL. You can then copy this link and reference it anywhere within the portal. You can even reference this document outside of the portal as long as your portal is running and the document is still in the repository. Refer to figure below.
Like the Document Library, the Image Gallery provides a centralized repository for images used throughout the Liferay Portal and assigns a unique URL to each image.
To add an image to the Image Gallery portlet, first add a folder by clicking the Add Folder button. This is similar to adding a folder to the Document Library, described in Section 1.1 in this chapter. This use case will show an Image Gallery with a folder called Showcase.

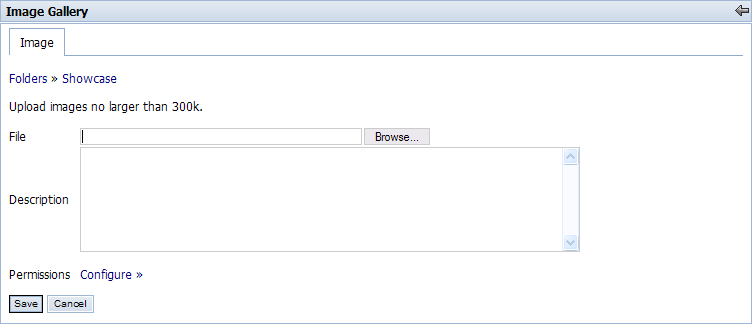
We will now add an image to the Showcase folder. Click on the Showcase folder and click on Add Image to add a new image.

Here we add the image by pressing the Browse button and selecting the image to upload. Keep in mind that image size can be no larger than 300k. Give an easily identifiable description for the image, and then click Save.
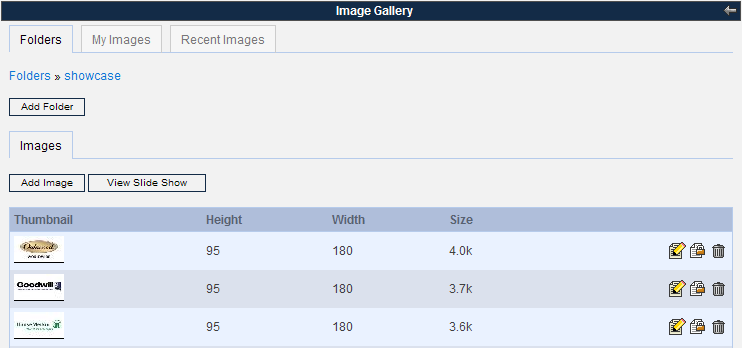
After saving, you are returned to the folder in which you saved it in. As can be seen by the breadcrumb, the Showcase folder is displayed in the figure below. You can position your cursor over the image for a description, and click on the image for a full-size view.
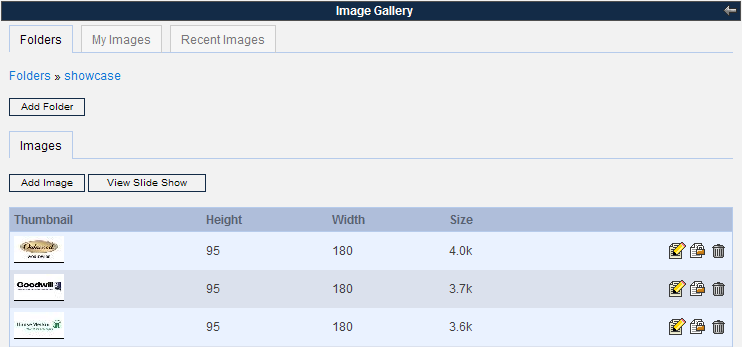
To reference an image in the Image Gallery, you must first find which folder the image is contained in. Using the same use case as in 2.2.1, we see that our image is located in the Showcase folder as shown by the breadcrumb.

Click on the Edit icon (
 ) to view the properties of the image. The
URL is highlighted in the picture below. To reference this image
in Journal Templates in this use case, you would type in
@root_path@/image/image_gallery?img_id=1100. Templates are
described more completely in section 3.2.
You can view all the images from a folder in a slideshow. To view the slideshow, click on the View Slide Show button in the folder you want to view.
A new window will appear showing a full-size image and a set of commands. It will repeatedly scroll through the images inside the folder chosen. To view images at your own pace, press Pause and press the Next or Previous buttons to change images. There is also a speed setting from 1 through 10, with 1 being the fastest and 10 the slowest. Press Play to resume the slideshow at the chosen speed.
Table of Contents
The Journal application is composed of four portlets:
- Journal
Is an administration portlet that allows the creating, updating searching and managing contents
- Journal Articles
Allows displaying of a set of contents that satisfy a set of conditions configured through the portlet preferences such as content type and community.
- Journal Content
Allows displaying one or more contents manually selected from the list of available portelts. If more than one content is selected only one at a time will be shown and links will be added to allow the user to navigate to the rest of the contents.
- Journal Content Search
Allows users to search for Journal content.
the Journal portlet is used to create all CMS content and the Journal Articles and Journal Content portlets are used to display those contents. This portlet allows writers to easily edit content displayed on web pages without having to sort through complex code.
Before getting into the details of how to use the Journal portlet, it is useful to understand structures, templates, and articles; they are the backbone of the Journal portlet's functionality.
Structures define the type and number of content pieces (e.g. text, text area, images, selection lists, etc.)
Templates determine how content pieces will be arranged or laid out
Articles are where each content piece is populated with actual text and images
The point of a structure is to unify journal articles with the same numbers and types of items. For example, a Management Bio section of a website might have ten biographies, each requiring an image for the executive headshot, a text for the headline, and a text area for the main biography. A structure would be created with one image, one text, and one text area, each named accordingly. This allows writers to create the individual bios and other texts without needing to recreate the page structure for each biography.
Designers can create several templates for one structure to allow for a variety of presentations or they can give writers discretion in deciding the best layout.
All specific text and images are entered when a user adds or edits an article. This is also where a user chooses the layout based on the templates affiliated with a structure. Since multiple templates can be associated to a structure, the user can select the template that formats their article the way they want. Though articles normally have an associated structure and template (see SAMPLE-XSL-ARTICLE), it can also be a simple article without any associations (see SAMPLE-SIMPLE-ARTICLE).
Below is an example clarifying the definitions given above:

The structure in this case lists out the six content pieces:
One text element named "headline" (1)
Three text area elements named "body-text" (4), "caption-1" (2), and "caption-2" (6)
Two image elements named "image-1" (3) and "image-2" (5)
The XSL template for this example would specify where the headline, text areas, and images should go. It places the captions to the sides of the images. Another template can be made for the same structure that has the captions below the images.
The article is the actual content that uses the template and structure. This particular article is about the alleged effects of professional football broadcasts on the behavior of the children who watch them. Two photos are uploaded and body text and headline are filled in. Another article may be generated using the same template and structure discussing the equipments used for fly fishing.
It should be noted that the proper order for creating an article from start to finish is:
Create the structure to set the fields that content will be entered.
Create the template to associate with the structure to define the layout of the content in question.
Create the article with the hard-coded content that will be displayed on the page, choosing the proper structure and template to be used for the article.
To add a structure, first click on the Structures tab in the Journal Portlet, and then click on the Add button. The structure creation page will be displayed.
Give your structure an ID or have it auto-generate one. It is recommended that you choose your own ID so that the structure will be easier to identify when associating it with templates and articles. Please note that the ID must be unique. The convention is to separate words in the ID with a hyphen, e.g., “BASIC-STRUCTURE-NAME." The structure ID can not be changed once your structure has been saved, so be sure that the ID is exactly how you would want it to appear.
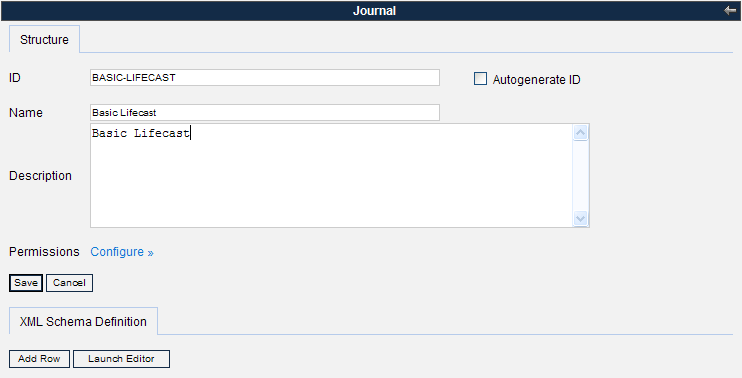
Give your structure a clear name and description because these fields are also used for identification of the structure.
To start adding fields to the structure, click the Add Row button. This will show a new field where you can enter a name and a content type for this field (image, text, boolean flag, etc.). Those comfortable with XML or HTML can edit the XSL directly by clicking Launch Editor. Both methods of adding/editing elements will work, and both can be used in the same session. One simple approach is to add a few elements using the GUI and then to edit the XML directly (which will contain the syntax for the already added elements and can be copy-pasted).
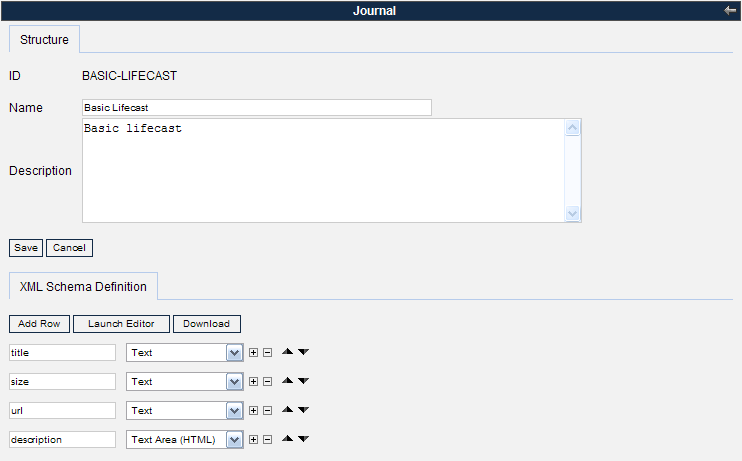
Keep in mind that all names of fields must be one word—a description such as “Content Title" would not be allowed. To name a field using multiple words, put a dash in between words to prevent confusion, such as “content-title."
From the Selection List and Multi-Selection List, press the
 button to add extra options to the lists,
and use the
  and
and  buttons to move the options up and down
on the display for the article.
buttons to move the options up and down
on the display for the article.Once all the fields have been added to the structure, click the Save button, located above the XML Schema Defintion tab. If no error messages appear, the structure has now been created and can be associated to templates.
To edit an existing structure, go to the Structures tab. There you will see a list of existing structures with pagination and an area to search for structures by ID, name, and/or description. You can use either method to locate the structure you wish to edit. Before editing the actual structure, it is advisable to view the associated articles and templates because they can potentially be affected by any changes made to your structure. You can view associated articles (
 ) and templates (
 ) by clicking on their respective icons.
When you are done viewing associated articles and templates,
find the structure again using either method above. Click on the
Structure ID, description, or the Edit icon (
 ) to display the editing screen, shown
below.
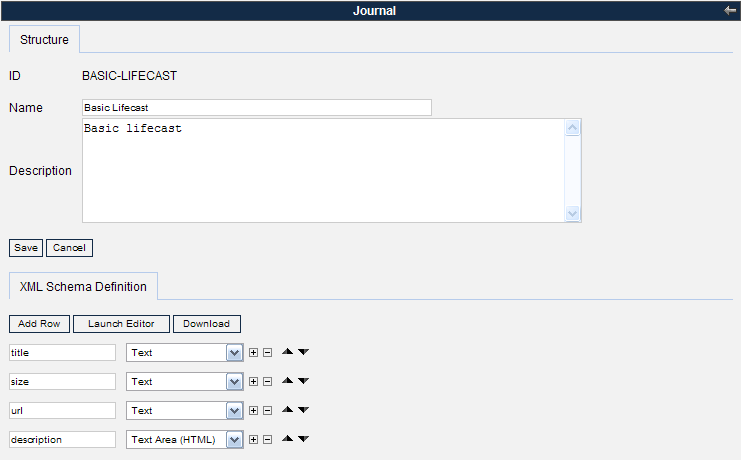
In the edit screen, you can edit anything in the structure except for the structure ID, which can not be changed once the structure has been created.
Editing the name and description will not affect other features of the Journal portlet, but adding, deleting, and modifying fields will affect the templates and articles that are associated with the structure. It is advisable to backup the current XML file first by clicking the Download button so that it will be easy to revert to your old structure if necessary.
If you add fields, the articles associated will have extra fields for additional content. If you delete fields, associated content and articles will be deleted. For example, notice that the structure above has a tltle field. Now look at the article below that uses a structure that has something in that field.

When you delete the field from the structure (title in this case), either by deleting the row or deleting it through the editor, the associated article will not show the field.
So when you delete fields, be certain that associated articles no longer need those fields. This also applies if you rename a field; there will be a new field inside the article with that name and field type, but the content that was in the old field will be gone. For an article to display properly, the template layout must also be changed when fields are added or modified.
When all changes have been made, click the Save button to save your changes.

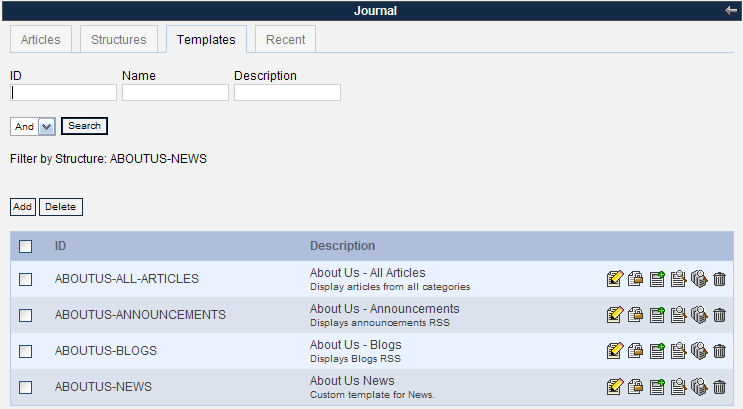
To delete a structure, you must first delete all articles and disassociate or delete all templates associated with that structure. First search for the structure you wish to delete, such as ABOUTUS-NEWS, using the same method as step 1 of section 3.2.2. To delete all articles, first click the View Articles icon (
 ), which takes you to a view of all
associated articles, shown below.
The screen above shows what filter was used to find the articles. Edit or delete all of these articles. To delete, click the Delete icon (
 ) next to the article you wish to
delete.
) next to the article you wish to
delete.Once all articles have been edited or deleted, go back to the Structures tab and find the structure you wish to delete. Click on the View Templates icon (
 ) to take you to a view of all associated
templates.
Edit or delete all of these templates. To delete, click the Delete icon (
 ) next to the template you wish to delete.
To edit, begin by clicking the Edit icon (
 ) next to each template. Inside the edit
template screen, change the structure by clicking the Select button next to the Structure field
so that it no longer uses the structure you wish to delete.
Click the Save button when you
have selected a new structure for the template to be associated
with.
) next to each template. Inside the edit
template screen, change the structure by clicking the Select button next to the Structure field
so that it no longer uses the structure you wish to delete.
Click the Save button when you
have selected a new structure for the template to be associated
with.Once all articles and templates have been disassociated from the structure, search for the structure once again in the Structures tab, then click the Delete icon (
 ) next to that structure.
To add a template, first click on the Templates tab, and then click the Add button. If you already know which structure this template is associated with, you can create the template by clicking the Structures tab, finding the associated structure, and then clicking the Add Template icon (
 ). Both examples are shown below.
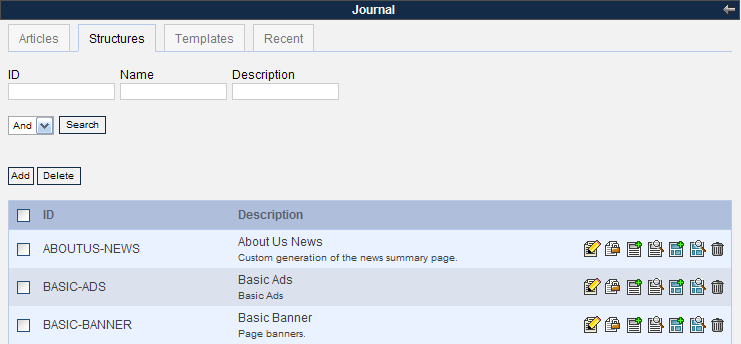
The template creation page appears. Give your template an ID or have it auto-generate one. Refer to step 2 of section 3.2.1 for template ID recommendations. Template IDs must be unique.
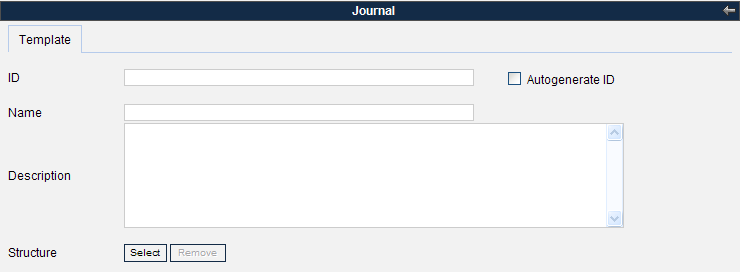
Give your template a clear name and description because these fields are also used for identification of the template.
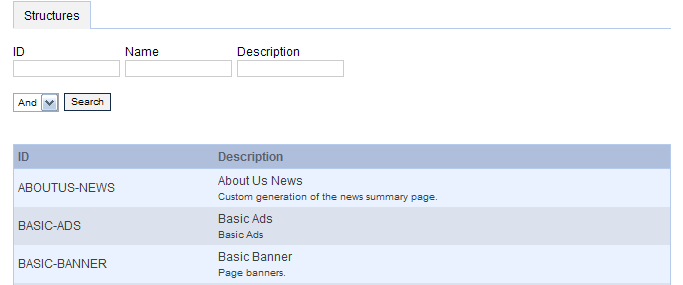
Since articles have to select a structure before choosing a template (further described in section 3.4.1.), all created templates have to be associated with a structure. If you have already associated this template to a structure, the structure name will appear in the Structure field. Otherwise, click the Select button to find the structure that this template will be associated with. This will open up a screen with all the structures. Click on a structure to associate with the template.
To edit the actual template layout content, you can use one of two methods. To start a completely new template, click the Launch Editor button to open up the editor shown below.

If you have an existing template on your local machine, click the Browse button to search for the file, and load that file as the code for this template.

Note that you can choose the template to be in either XSL or VM format, so a working knowledge of one of these is required for creating templates. One way to make simple templates is to look at the existing templates that Liferay provides out-of-the-box and follow the syntax. If the template is loaded from your local machine, make sure you choose the correct language type in the menu.
If you want a small image to represent the template in the description field, you can link the image URL or upload it from your local machine. Be sure to select Yes in the menu in the “Use Small Image" field.
Click Update when you are finished creating your template. If no error messages appear, the template has been created and can be used as layouts for articles.
To edit an existing template, go to the Templates tab. You will see a list of existing templates with pagination and an area to search for templates by ID, name, and/or description. You can use either method to locate the template you want to edit. Before editing the actual template, it is advisable to view the associated articles because their layout will be affected by any changes made to your structure. After editing the template, you can view these articles with the new template layout. You can click on the View Articles icon (
 ) to view associated articles. When you
are done viewing associated articles, find the template again
using either method above, and then click on the Template ID,
description, or the Edit icon
(
 ) to enter the editing screen, shown
below.
) to enter the editing screen, shown
below.In the edit screen, you can edit anything in the template except for the template ID, which can not be changed once the template has been created.

Editing the name and description will not affect any other features of the Journal portlet but modifying the script will affect the articles that are associated with the template. It is advisable to backup the current XSL or VM file by clicking the Download button so that it will be easy to revert to your old template script if necessary. To prevent unexpected behavior in the design, it is advised that only users with good working knowledge of XSL or VM modify these scripts.
When all changes to the template have been made, click the Save button to save your changes.
To delete a template, you must first disassociate or delete all articles associated with that template. First search for the template you wish to delete using the same instructions from step 1 of section 3.3.2. To disassociate/delete all the articles, click the View Articles icon (
 ). A view of all associated articles will
be displayed.
To delete an article, click the Delete icon (
 ) next to the article you wish to delete.
To edit an article, begin by clicking the Edit icon (
 ) next to each article. Inside the edit
article screen, change the template by using radio buttons. If
there are no other templates associated with the structure used,
you must either create a new template for that structure or
delete this article. Click the Save button when you have selected a new
template for the associating article.
) next to each article. Inside the edit
article screen, change the template by using radio buttons. If
there are no other templates associated with the structure used,
you must either create a new template for that structure or
delete this article. Click the Save button when you have selected a new
template for the associating article.Once all articles have been disassociated from the template, search for the template again in the Templates tab, then click the Delete icon (
 ) next to that template.
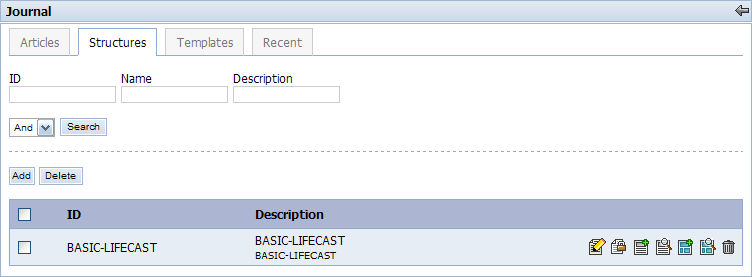
To add an article, click on the Articles tab, and then click the Add button.

If you already know which structure or template this article is associated with, you can create the article by going to the Structures or Templates tab. Find the corresponding structure or template, and click the Add Article icon (
 ).
).
The article creation page appears as shown below. Give your article an ID or have it auto-generate one. Refer to step 2 of section 3.2.1. for article ID recommendations. Article IDs must be unique.

Give your article a title. This field is also used for easier identification of the article, so a clear, concise explanation is recommended.
In the article tab screen shown above, choose the Type category that the article will reside in. This will help make it easier for users to make manual searches of articles and organize articles.
Next, pick a display and expiration date. The default setting does not set an expiration date.
Next, choose the structure and template that this article will be associated with. If none are selected, the article will be a simple article by default, and the display will be what is written in the content box. If you added the article through the structure or template tab, there will already be a structure and template choices, which you can further edit if you choose. To choose the structure, click the Select button next to the Structure field. If you have a pop-up blocker installed, you may need to turn it off because it can prevent the Structure list from appearing.

Once the structure and template has been chosen (if at all) the content fields will show up, and you can fill in the content in the fields given. Once all the content has been filled out, click the Save button to create the article.
Once you save the article, it will return you to the main Articles tab. To approve the article and allow the Journal Content article to display it, search for the article you just created. Click the Edit icon (
 ) for that article, and then click the
Approve button.
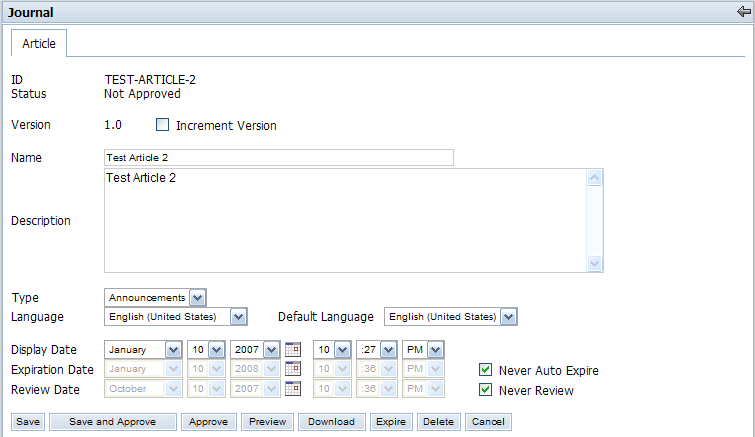
To edit an existing article, go to the Articles tab. You will see a list of all existing articles with pagination and an area to search for articles by ID, Version, Name,Description, Content, Type, and/or Status. You can use any of these methods to locate the article you want to edit. When you find the article , you can either click on the article ID or click on the fields to view a preview of the article.
Click on the Edit icon (
 ) to enter the editing screen. In this
screen you can edit anything in the article except for the
article ID, which can not be changed once the article has been
created. You can choose to increment the version every time you
edit the article to help all users see how often an article has
been changed. If you feel that the changes you are making are
very minor, you can choose not to increment it. Note that if you
change the expiration date before the current date, you will no
longer be able to select that article for use in the Journal
Content portlet.
When you are done editing the changes, click the Save button to finalize any changes you have made. To preview your changes, search for the article again and click on the article, or go to the article edit screen and click the Preview button, shown in the picture above.
To delete an article, search for the article as instructed in step 1 of section 3.4.2. Once you have found the article, click the Delete icon (
 ).
).If you do not wish to delete the article but do not want the article to be available for display through the Journal Content portlet, you can edit the expiration date of the article so that it is set to before today’s date. Refer to section 3.4.2. to edit the expiration date of an article.
Table of Contents
The Journal Articles portlet and the Journal Content portlet are used to display content created through the Journal portlet. While the Journal portlet creates all content used in CMS, it is the Journal Articles and Journal Content portlet that actually display content to portal users and guests.
The Journal Articles portlet allows a user to be shown articles that have been published within a particular Article Type. This may be Press Releases, Financial Reports, or a Software Version History. As long as there are published articles that can be read, a user can easily access them through the Journal Article portlet. Refer to the following example:
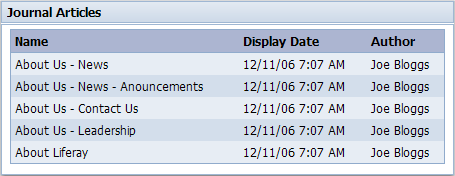
Anytime a new Press Release comes out, the Journal Articles portlet will dynamically show the article in the list. The user can simply click on the title to load the article in a new window.
To use this portlet (assuming it has been added to the current layout):
Click the Configuration link (
 ) to modify the properties of the portlet.
(If portlet borders are not showing, there will be a Configuration link at the top of the
portlet).
To choose a list of articles to display, choose the Community, Article, Display URL, Display per Page, Order by Column, and Order by Type. Click Save when finished. Leave (
 )the Setup screen to view the
portlet.
The Look and Feel tab allows you to Show Portlet Borders or enter an optional Portlet Title. Note that the title will only show up if the borders are displayed. Save when you are satisfied with the configurations.

The Journal Content portlet enables a Journal article to be requested and displayed on the portal page. You can easily build and lay out an entire public website with portlets. In fact, Liferay's own website has been built leveraging this new technology.
Shown below are five portlets highlighted in red. Portlet 2 is a Navigation portlet and portlet 4 is a Breadcrumb portlet. Both of those portlets are explained in more detail in Chapter 5. Portlets 1, 3, and 5 are Journal Content portlets that contain static Journal articles.

You can integrate the power of function-rich portlets with the more static information of a Journal article. A company may have an "Investors" page on their website. In one column you may see the Stocks portlet and in another column a Journal Content portlet. The Stocks portlet can display the company's ticker symbol with stock price and the Journal Content portlet can display static content of the latest financial reports. A mortgage company may want to have a Loan Calculator portlet right next to a Journal Content portlet showing an article with current rates and plans.
To use a Journal Content portlet:
Click the Configuration icon (
 ) to modify the properties of the portlet.
Position cursor over the portlet border to access the Configuration icon.
To display a list of articles to select from, select the Setup tab.

Select from the Type and Community drop down menu.
Click on the article you want to display.

With the Look and Feel tab selected, you can select whether to Show Portlet Borders or enter an optional Portlet Title. Note that the title will only show up if the borders are displayed. Click Save when finished.
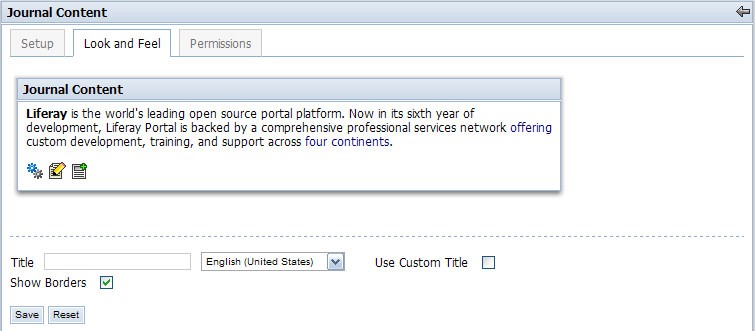
Exit the setup section by clicking on the return arrow (
 ). This will return you to the page that the
Journal Content portlet was added with the new Journal Article
displayed. Refer to figure below.
Table of Contents
There are other portlets that utilize CMS features. These portlets work together with CMS to add extra functionality to your portal.
The Breadcrumb navigation portlet shows the location of the current page in context of the site. This form of navigation helps the user visualize the structure of the site and quickly move from a page that is very specific to a broader grouping of information.

Simply add the Breadcrumb portlet to each page you want it on. The portlet will determine its place in the structure of the website and dynamically build its proper path.
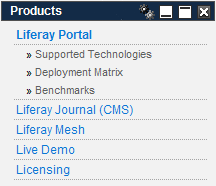
The Navigation portlet is similar to the Breadcrumb portlet in that it helps the user visualize the structure of the site and provides hyperlinks to quickly move from page to page. The advantage of the Navigation portlet is that it displays more information about the current page.
To configure the Navigation portlet, click on the Configuration icon (
 ).
).
With the Setup tab selected, you can select a Bullet Style and a Display Style.
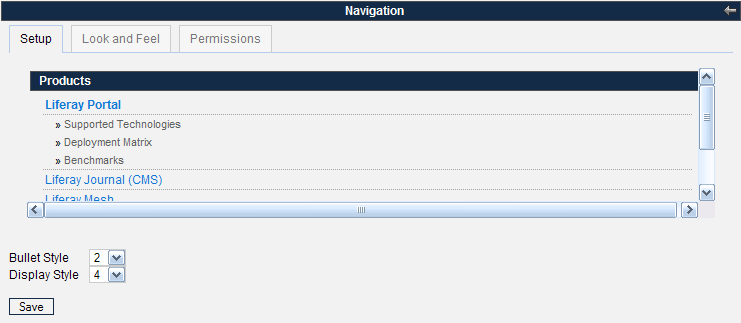
Below are several examples showing different bullet and display styles:
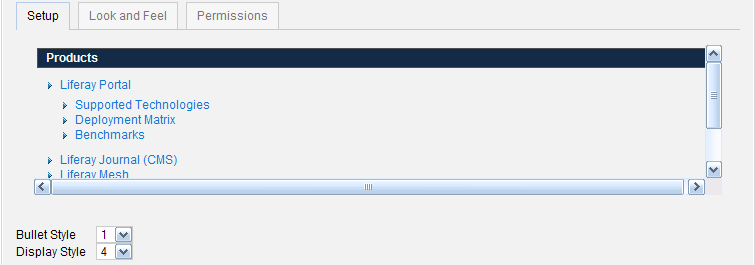
Example 1
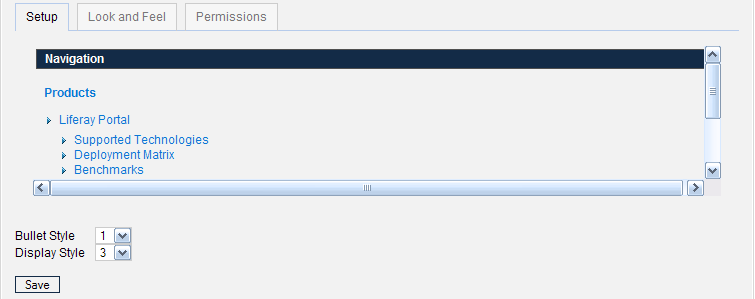
Example 2
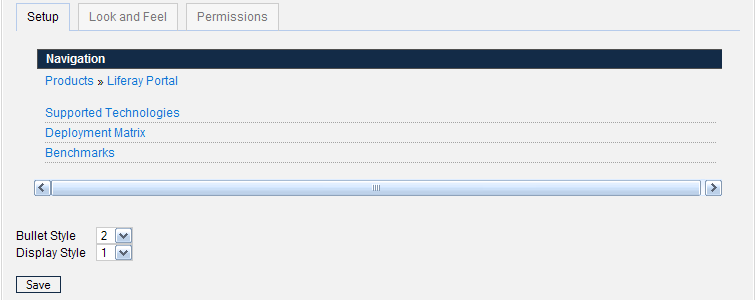
Example 3
With the Look and Feel tab selected, you can select whether to Show Portlet Borders or enter an optional Portlet Title. Note that the title will only show up if the borders are displayed. Click Save when finished.

Exit the setup section by clicking on the return arrow (
 ).
).
To associate navigation links with an article, click on Page Settings.
Select a page.
Click Type.
To associate a page with an article, select Article>Save>enter article ID>Save.
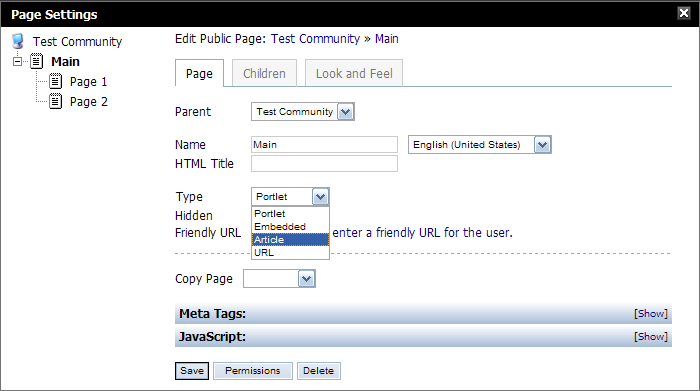
To associate navigation links with a portlet and URLs, click on Page Settings.
Select a page.
Click Type.
To associate a page with an article, select Portlet and click Save.

To associate navigation links with an embedded URL, click on Page Settings.
Select a page.
Click Type.
To associate a page with an embedded URL, select Embedded.
Save.
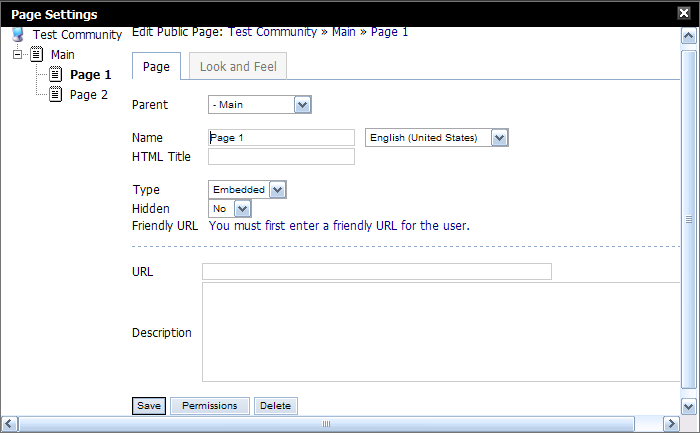
Enter a URL.
To associate navigation links with a URL that will open in a new window, click on Page Settings.
Select a page.
Click Type.
To associate a page with a URL that will open in a new window, click URL.
Save.
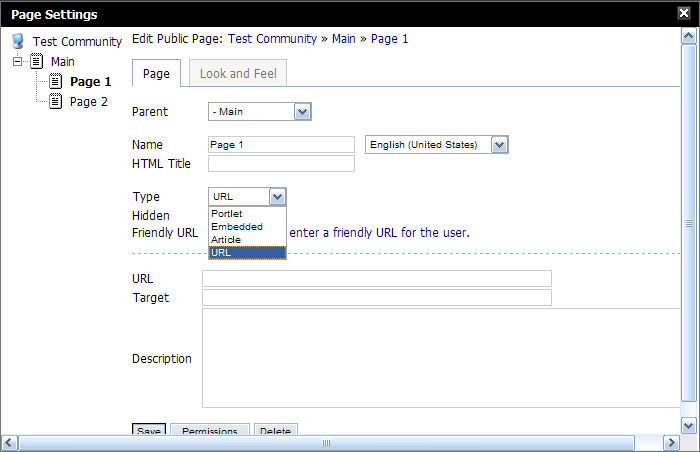
Enter a URL.
Enter
_blankin the Target field.Save.
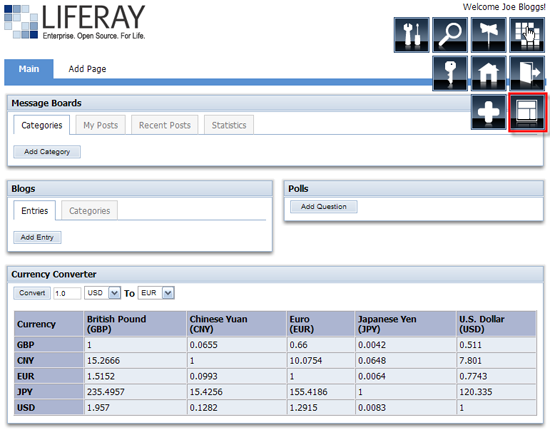
Our new layout design templates provide incredible flexibility for laying out portlets. Instead of being constrained to placing portlets under one, two, or three columns, you can now mix and match. Look at this example below:

Highlighted in red are four different portlets arranged in a 1-2-1 layout design template. The Message Boards portlet is laid across the entire width of the page, the Blogs and Polls portlets are distributed across the middle columns, and the stretch of the bottom column contains the Currency Converter.
To select a layout, click on the Layout button.
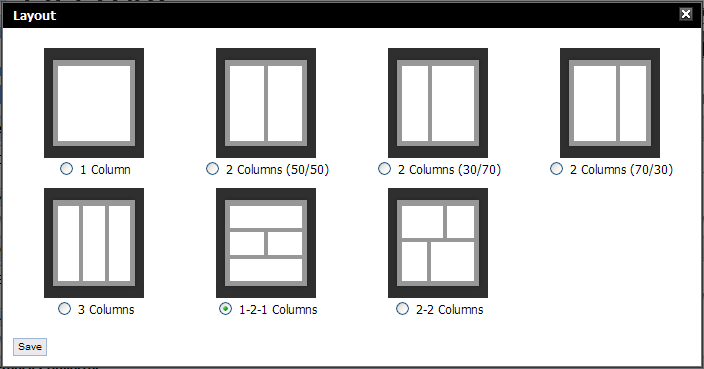
Select a layout and click Save.
Drag the portlets to a desired location.
![[Note]](images/note.png) | Note |
|---|---|
If the preloaded templates are insufficient for your needs, you can create your own deployable layouts, use a sample layout template, or use a community-submitted one. |
Table of Contents

Click Insert/Edit Image (
 ).
).Enter a URL or click Browse Server.

If Browse Server is selected, choose a community where the image will be stored in.
Click Create New Folder to add images to. Any folders and images that are added here will be placed in the Image Gallery. The Image Gallery provides a centralized repository for images to be stored and given a unique URL.
Type the name of the new folder and click OK.
Click on the newly created folder to add an image to it.
Click Browse and select an image.
Click Upload to add the image to the folder.
Click on the image and click OK to add the image to the document.
Click Save to save the updates.

Select text to link.
Click Insert/Edit link (
 ).
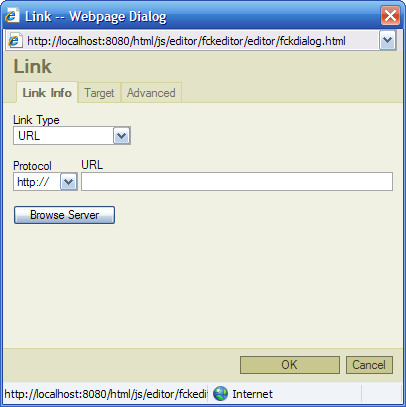
).You can add an URL directly or you can click Browse Server.
If Browse Server is selected, in the Resource Type menu you have the option to link it with a document, image, or page.
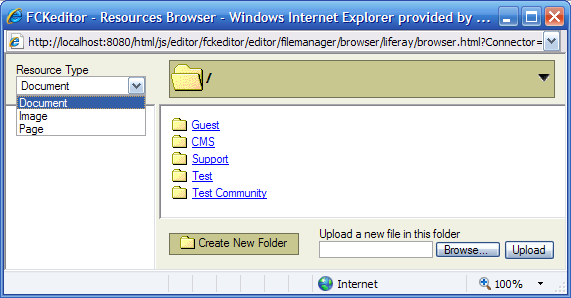
In the Resource Type menu select Document.
To link to a new document, select a community where document will be stored in.
Click Create New Folder. Any documents added here will be placed in the Document Library.
Enter the name of the new folder.
Click on the newly created folder to add a document to it.
Click Browse and locate document.
Click Upload to add the document to the folder.

Click on the document and click OK to link the document with the selected text.
In the Resource Type menu select Page.
Select the community where the page is located in.
The FCKeditor will show a site structure. Click on the page that you want to link the selected text to.

Click OK.
In the Resource Type menu select Image.
Select the community where the image is located in or will be stored in.
If the image is stored in the system, click on theimage to link with the selected text and click OK.
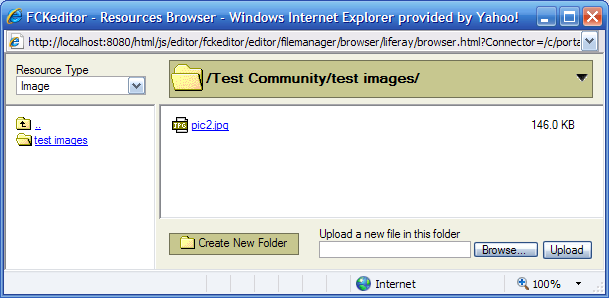
To link to a new image, select a folder to upload the image to or click Create New Folder to add a new folder to place the image in. Any images added here will be placed in the Document Library. If using an existing folder, skip to Step 8.
Enter the name of the new folder.
Click on the newly created folder to add an image to it.
Click Browse and locate the image.
Click Upload to add the image to the folder.
Click on the image and click OK to link the image with the selected text.
