Various functions can be performed to your organization and to location and users that belong to your organization.
Click on the Organizations tab in the Organization Admin portlet to display the Organization Screen.
Your organization appears on the bottom of the Organization Screen. Click on the organization to view.

To edit your organization, click on the Organizations tab in the Organization Admin Portlet.
Click the Edit icon (
 ) located to the right of the organization
listing.
) located to the right of the organization
listing.Enter changes in the Name input field. Select from the Country, Region, and Status menu to make changes.
Click Save.
To view a location, click on the Locations tab in the Organization Admin Portlet.
A listing of locations appears on the bottom of the Locations Screen. Click on a location you want to view.
A location information screen will appear.
You can also view locations through the Organization Screen:
Click on the Organization tab in the Organization Admin Portlet.
Click on the View Location icon (
 ) located to the right of your
organization.
) located to the right of your
organization.Click on a location to view.
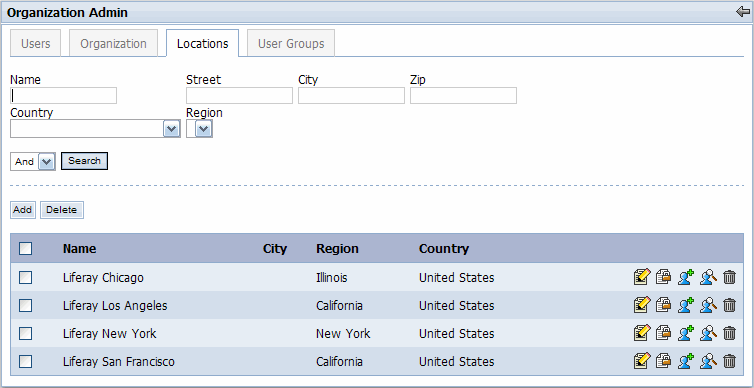
To search for locations that belong to your organization, click on the Locations tab in the Organization Admin Portlet.
Type location information in the text boxes and select from the menu options.
Click Search.
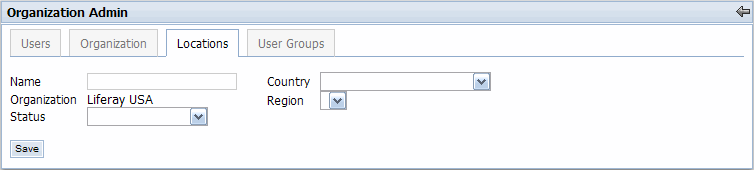
To add locations to your organization, click on the Locations tab in the Organization Admin Portlet.
Click Add.
Enter location information in Name input field.
Select from the Country, Status, and Region menus.
Click Save.
To add additional locations, repeat steps 1-5.
You can also add locations through the Organization Screen:
Click on the Organization tab in the Organization Admin Portlet.
Click on the Add Location icon (
 ) located to the right of the
organization.
) located to the right of the
organization.Enter the location’s information in the input fields and select from the menus.
Click Save.
To edit locations that belong to your organization, click on the Locations tab in the Organization Admin Portlet.
Locate the location want to edit. Click the Edit icon (
) located to the right of the location
listing.Type changes in the Name input fields. Select from the Country, Region, and Status menu to make changes.
Click Save.
You can view all users that belong to your organization or view users that belong to a specific location.
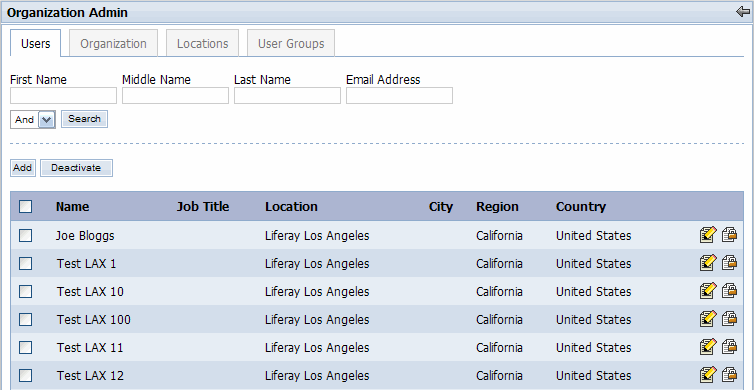
Click on the Users tab in the Organization Admin Portlet.
A listing of users appears on the bottom of the Users Screen. Click on a user you want to view. To view additional users, click on the page numbers to see additional user listings.
You can also view users through the Organization Screen:
Click on the Organization tab in the Organization Admin Portlet.
Click on the View Users icon (
 ) located to the right of the
organization.
) located to the right of the
organization.Click on a user to view.
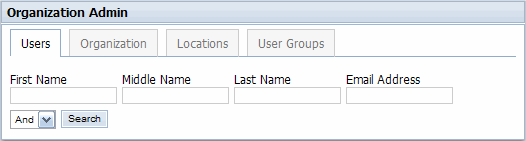
To search for users that belong to your organization, click on the Users tab in the Organization Admin Portlet.
Type user name in the input fields and select from the menu.
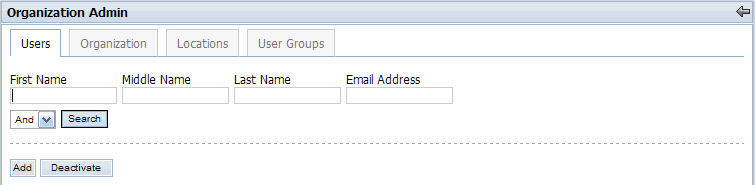
Click Search.
To add users to your organization, click on the Users tab in the Organization Admin Portlet.
Click Add.
Enter user’s information in the input fields and select from the pull down menus.
Click Save.
To add additional users, repeat steps 1-4.
You can also add users through the Organization Screen:
Click on the Organizations tab in the Organization Admin Portlet.
Click on the Add User icon (
 ) located to the right of the
organization.
) located to the right of the
organization.Enter user’s information in the input fields and select from the pull down menus.
Click Save.
To add additional users, repeat steps 1-4.
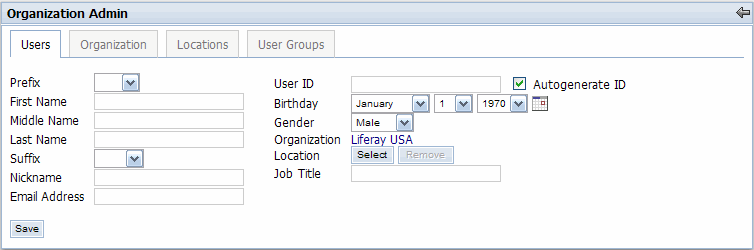
To edit user information, click on the Users tab in the Organization Admin Portlet.
Click on the user you want to edit.
Type changes in the First Name, Middle Name, Last Name, Email, and Job Title input fields. Select from the Prefix, Suffix, Birthday, Gender, Location menus to make changes.
Click Save.
To deactivate users, click on the Users tab in the Organization Admin Portlet.
Click on the box located next to the user you want to deactivate.
Click Deactivate.
To deactivate all users listed on a page, click the box located next to the Name column. Click Deactivate.
A screen will appear asking if you want to deactivate the selected users. Click OK to delete. Click Cancel if you do not want to deactivate the selected users.
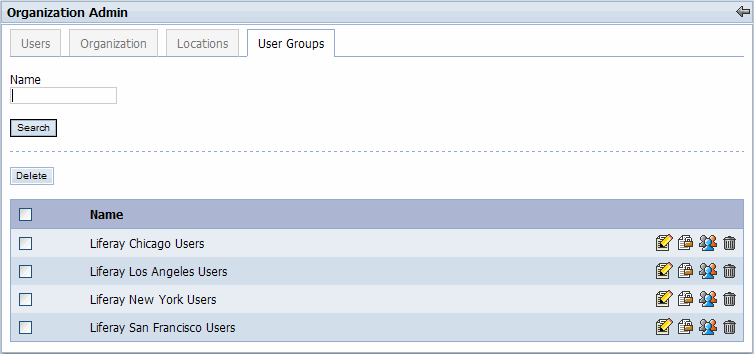
Click on the User Groups tab in the Organization Admin Portlet.
A listing of user groups appears on the bottom of the screen. Click on a user group you want to view. NOTE: Clicking on a user group will only display the name and description of the group. To actually view the users associated with the user group, click on the Assign icon.
To search for user groups, click on the User Groups tab in the Organization Admin Portlet.
Type a user group name in the Name input field.
Click Search.
To edit user group information, click on the User Groups tab in the Organization Admin Portlet.
Locate the user group you want to edit. Click the Edit icon (
) on the right of the user group.Type changes in the Name input field and, optionally, the Description text area.
Click Save.
Click on the User Groups tab in the Organization Admin Portlet.
To delete a single user group, click on the Delete icon (
 ) to the right of the user group. Click
OK to delete.
) to the right of the user group. Click
OK to delete.To delete multiple user groups, check the boxes located to the left of the user groups you want to delete.
Click the Delete button.
To delete all user groups listed on a page, check the box located next to the Name column.
Click the Delete button.
A screen will appear asking if you want to permanently delete the selected user groups. Click OK to delete. Click Cancel if you do not want to delete the selected user groups.
Click on the User Groups tab in the Organization Admin Portlet.
Click on the Assign icon (
 ) to the right of the user group. For this
example, assume the Assign icon
for the Liferay San Francisco Users user group was clicked. The
following screen is displayed.
) to the right of the user group. For this
example, assume the Assign icon
for the Liferay San Francisco Users user group was clicked. The
following screen is displayed.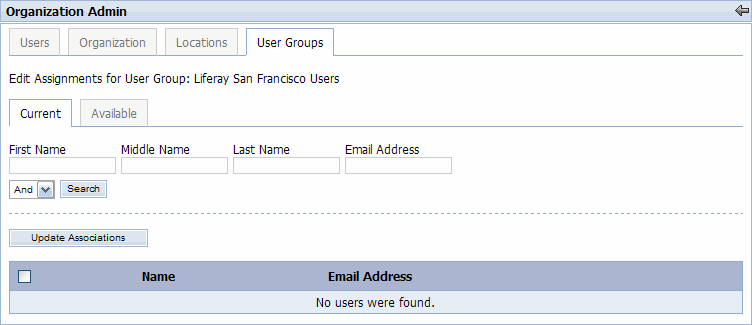
Click on the Available tab to list all of the available users in the system. For this example, we are only interested in the users with "SFO" in their name.
Search for the desired users using the search form. For this example, enter "sfo" into the Last Name input field and click Search.
Check the boxes to the left of the desired users. If you would like to select all of the users on the page, check the box next to the Name column.
Click the Update Associations button.
To confirm the desired users were successfully associated with the user group, click on the Current tab.