This section will take you through an example-driven tutorial on
how to develop a StrutsPortlet. It is assumed that you have an extension
environment installed in a directory called ext. It
is also assumed that you will be using Tomcat as the application
server.
The goal of this section is to create a Struts Portlet within Liferay.
Define the portlet
portlet-ext.xml
liferay-portlet-ext.xml
Define the page flow and layout
struts-config.xml
tiles-defs.xml
Create the JSP
view.jsp
What are the main differences between a JSP Portlet and a Struts Portlet?
struts-config.xmltiles-defs.xml
Instead of forwarding directly to a JSP
struts-config.xml– define the page flowtiles-defs.xml– define the page layout
Struts implements MVC. Although there are other frameworks that implement MVC, Struts is the most widely used and mature technology.
What is MVC? MVC separates the presentation code from the business logic code.
Struts provides centralized page-flow management in the form of struts-config.xml. This makes it highly scalable and allows you to modularize the coding process.
By using Struts, you will be using a number of best practices that have been built into the framework.
A page layout is typically designed using include statements. If there are 100 JSPs and the header and footer need to be swapped, all 100 JSPs need to be changed. With Tiles, a single template can be used to determine the page layout. Only the template needs to be changed, and all the pages will be updated accordingly.

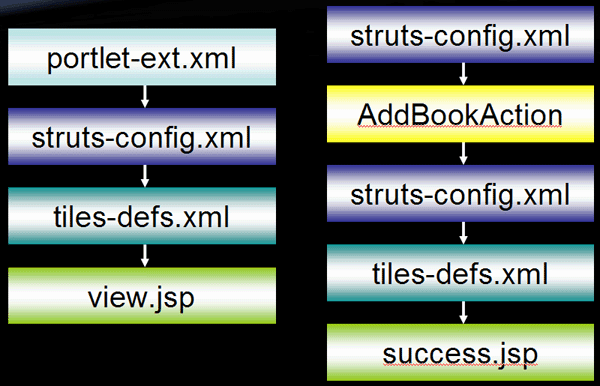
A URL or URI is passed to the Controller.
The Controller determines what page should be displayed.

Example:
How does Liferay determine which JSP is displayed first?
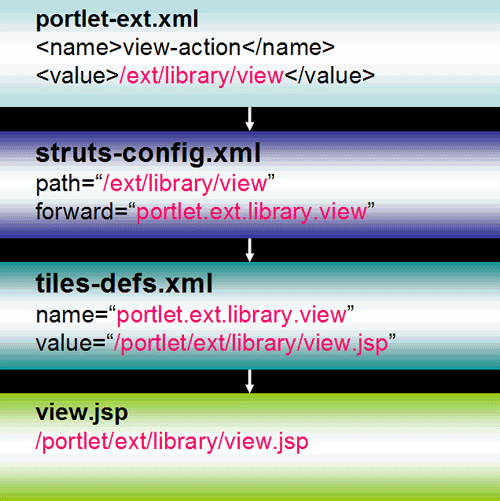
Our starting point is portlet-ext.xml view-action
Controller
 MainServlet.java
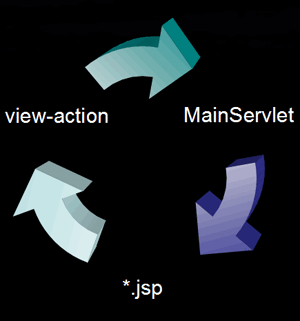
Detailed View:
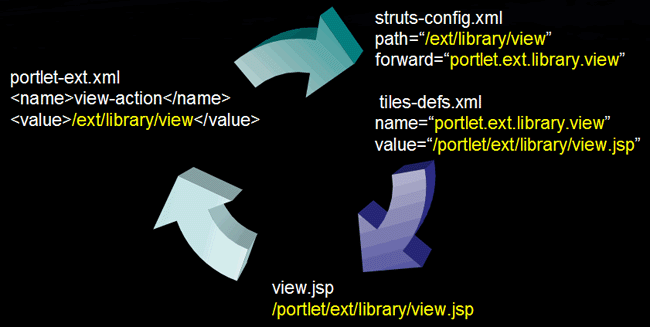
Configuration files are located in this directory:
…\ext\ext-web\docroot\WEB-INF
JSPs will be placed in this directory:
…\ext\ext-web\docroot\html\portlet\ext
Add the following portlet definition to the
portlet-ext.xml file:
<portlet>
	<portlet-name>EXT_4</portlet-name>
	<display-name>Library Portlet</display-name>
	<portlet-class>com.liferay.portlet.StrutsPortlet</portlet-class>
	<init-param>
		<name>view-action</name>
		<value>/ext/library/view</value>
	</init-param>
	<expiration-cache>0</expiration-cache>
<supports>
		<mime-type>text/html</mime-type>
	</supports>
	<resource-bundle>com.liferay.portlet.StrutsResourceBundle</resource-bundle>
	<security-role-ref>
		<role-name>power-user</role-name>
	</security-role-ref>
	<security-role-ref>
		<role-name>user</role-name>
	</security-role-ref>
</portlet>
Next add the following Liferay specific info to
liferay-portlet-ext.xml:
<portlet>
	<portlet-name>EXT_4</portlet-name>
	<struts-path>ext/library</struts-path>
	<use-default-template>false</use-default-template>
</portlet>
The struts-path is used to implement security.
http://localhost:8080/c/portal/layout?p_l_id=PRI.15.1&p_p_id=EXT_4&p_p_action=1&p_p_state=maximized&p_p_mode=view&p_p_col_id=column-1&p_p_col_pos=5&p_p_col_count=6&_EXT_4_struts_action=%2Fext%2Flibrary%2Fview
struts_action=“/ext/library/view”
struts-config.xml defines the page flow
<action path="/ext/library/view" forward="portlet.ext.library.view" />
What is /ext/library/view?
portlet-ext.xml:
<init-param>
	<name>view-action</name>
	<value>/ext/library/view</value>
</init-param>
What is portlet.ext.library.view?
It is the forward that is used to look up the tiles definition.
tiles-defs.xml defines the page layout
<definition name="portlet.ext.library" extends="portlet" />

<definition name="portlet.ext.library.view" extends="portlet.ext.library">
	<put name="portlet_content" value="/portlet/ext/library/view.jsp" />
</definition>
What is portlet.ext.library.view?
From struts-config.xml
<action path="/ext/library/view" forward="portlet.ext.library.view" />
<definition name="portlet.ext.library" extends="portlet" />

<definition name="portlet.ext.library.view" extends="portlet.ext.library">
	<put name="portlet_content" value="/portlet/ext/library/view.jsp" />
</definition>
What is /portlet/ext/library/view.jsp?
For reference: portlet-ext.xml from JSP Portlet Training
	<init-param>
		<name>view-jsp</name>
		<value>/portlet/ext/jsp_portlet/view.jsp</value>
	</init-param>
For the JSP Portlet, the JSP was pointed directly from portlet-ext.xml. For Struts portlets, this is done through tiles-defs.xml
<definition name="portlet.ext.library" extends="portlet" />

<definition name="portlet.ext.library.view" extends="portlet.ext.library">
	<put name="portlet_content" value="/portlet/ext/library/view.jsp" />
</definition>
What is portlet?
Portlet is the template that will be used (portlet.jsp). See …\portal\portal-web\docroot\WEB-INF\tiles-defs.xml for more information.
What is portlet.ext.library?
portlet.ext.library extends portlet. This means that portlet.ext.library will use the portlet.jsp as its template.
portlet.ext.library.view extends portlet.ext.library. This means that portlet.ext.library.view will also use portlet.jsp for its template.
The next step is to create the JSP.
Create a directory called library here:
…\ext\ext-web\docroot\html\portlet\extYour directory structure should now look like this:
…\ext\ext-web\docroot\html\portlet\ext\libraryCreate view.jsp in the library directory:
…\ext\ext-web\docroot\html\portlet\ext\library\view.jspEnter “Simple Struts Portlet!” in view.jsp
Once you have finished modifying all of the files, deploy them to Tomcat.
Open up a cmd prompt.
Click Start, Run, and then type cmd.
Navigate to your ext directory and then type ant deploy.
…\ext>ant deploy
Verify that the files were deployed to Tomcat.
Go to
…\tomcat\webapps\ROOT\WEB-INFand openportlet-ext.xml,liferay-portlet-ext.xml,struts-config-ext.xml, andtiles-defs-ext.xmlto check that the files were deployed correctly.Go to
…\tomcat\webapps\ROOT\html\portlet\ext\libraryand open upview.jspto see that it was deployed correctly.
Restart Tomcat.
Open up a new browser and type:
http://localhost:8080
LOGIN: test@liferay.com
PASSWORD: test
Click Add Content>Undefined.
Click javax.portlet.title.EXT_4.

Now that we’ve finished building the framework for our portlet, let’s move on to the next exercise. In this exercise, we will:
Create a new file called
init.jspwhere we will add commonly used variables and declarations.Set the portlet title.
Add the portlet to a category.
Create init.jsp in the library directory:
…\ext\ext-web\docroot\html\portlet\ext\library\init.jsp
Enter the following in
          init.jsp:
	<%@ include file="/html/common/init.jsp" %>
	<p>Add commonly used variables and declarations here!</p>
What file are we including with this line?
	<%@ include file="/html/common/init.jsp" %>
…\portal\portal-web\docroot\html\common\init.jsp
This will gives us access to the Liferay tag libraries.
Add this line above “Simple Struts Portlet!” in view.jsp:
<%@ include file="/html/portlet/ext/library/init.jsp" %>
	Simple Struts Portlet!
This will give us access to the init.jsp located here:
…\ext\ext-web\docroot\html\portlet\ext\library\init.jspAnt deploy. You do not have to restart Tomcat.
The following should now be displayed: Add commonly used variables and declarations here! Simple Struts Portlet
Go to Language-ext.properties and add the following line:
…\ext\ext-ejb\classes\content\Language-ext.propertiesjavax.portlet.title.EXT_4=LibraryAnt deploy and Restart Tomcat.
The portlet title will now be “Library.”
Go to liferay-display.xml and add the following line:
…\ext\ext-web\docroot\WEB-INF\liferay-display.xml<category name="category.test"> <portlet id=“EXT_3" /> <portlet id="EXT_4" /> ... </category>
You will now be able to select your portlet from the “Test” category.
<portlet>
	<portlet-name>EXT_4</portlet-name>
	<struts-path>ext/library</struts-path>
	<use-default-template>false</use-default-template>
</portlet>
Liferay will check the struts-path to check whether a user has the required roles to access the portlet.
Note: When you see the error message: You do not have the required roles to access this portlet.
Check to see that you have defined the roles correctly in portlet-ext.xml.
Check the <struts-path> to see if you have defined it correctly.
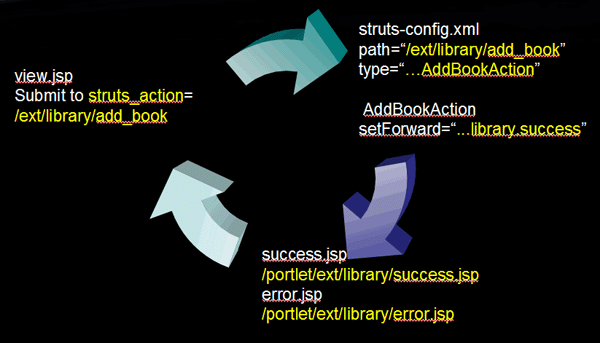
The goal of this section is to add an Action Class to the Struts Portlet and to display an success page.
Define the Action.
struts-config.xml
tiles-defs.xml
Update existing JSP files.
view.jsp
init.jsp
Create success and error JSP files.
error.jsp
Success.jsp
Create Action Class to process submit.
AddBookAction.java
What are the main differences between a JSP Portlet and a Struts Portlet?
JSP Portlet goes directly to a JSP
Struts Portlet has an page flow
Where does the page flow get defined?
struts-config.xml – define the page flow
tiles-defs.xml – define the page layout
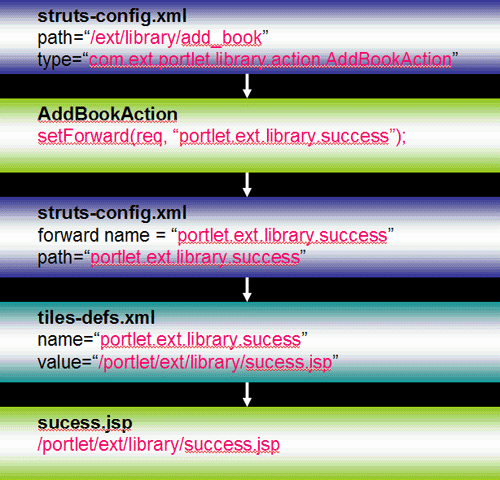
struts-config.xml defines the page flow
<action path="/ext/library/view" forward="portlet.ext.library.view" />
Lets add another path to the page flow
<action path="/ext/library/add_book" type="com.ext.portlet.library.action.AddBookAction">
	<forward name="portlet.ext.library.error" path="portlet.ext.library.error" />
	<forward name="portlet.ext.library.success" path="portlet.ext.library.success" />
</action>
What is type?
Type is a Struts defined way of passing control to the AddBookAction class.
Lets look at the forward nodes:
<forward name="portlet.ext.library.error" path="portlet.ext.library.error" />
<forward name="portlet.ext.library.success" path="portlet.ext.library.success" />
What is name?
It the unique identifier for that forward node.
What is path?
This is your link to the
tiles-def.xml.
tiles-defs.xml defines the page layout
<definition name="portlet.ext.library" extends="portlet" />

<definition name="portlet.ext.library.view" extends="portlet.ext.library">
	<put name="portlet_content" value="/portlet/ext/library/view.jsp" />
</definition>
Lets add the error and success paths
<definition name="portlet.ext.library.error" extends="portlet.ext.library">
	<put name="portlet_content" value="/portlet/ext/library/error.jsp" />
</definition>

<definition name="portlet.ext.library.success" extends="portlet.ext.library">
	<put name="portlet_content" value="/portlet/ext/library/success.jsp" />
</definition>
Update init.jsp in the library
directory
…\ext\ext-web\docroot\html\portlet\ext\library\init.jsp
Remove the following:
<p>Add commonly used variables and declarations here!</p>
init.jsp should only contain this
line:
<%@ include file="/html/common/init.jsp" %>
Review: What does including this file give us?
<%@ include file="/html/common/init.jsp" %>
…\portal\portal-web\docroot\html\common\init.jsp
This will give access to the Liferay tag
          libraries.
<%@ include file="/html/portlet/ext/library/init.jsp" %>

<br/>
Add a book entry to the Library:
<br/><br/>
<form action="<portlet:actionURL windowState="<%= WindowState.MAXIMIZED.toString() %>"><portlet:param name="struts_action" value="/ext/library/add_book" /></portlet:actionURL>" method="post" name="<portlet:namespace />fm">

	Book Title:

	<input name="<portlet:namespace />book_title" size="20" type="text" value=""><br/><br/>

	<input type="button" value="Submit" onClick="submitForm(document.<portlet:namespace />fm);">
</form>
<br/>
What does “struts_action” do?
Struts_action is the ActionMapping to the struts-config.xml path.
<action path="/ext/library/add_book" type="com.ext.portlet.library.action.AddBookAction">
value=
"/ext/library/add_book“This is the link to the ActionPath.
Review
What does “struts_action” connect us to?
It connects us to the struts-config.xml
success.jsp Path:
ext-web/docroot/html/portlet/ext/library/success.jspsuccess.jsp Contents:
SUCCESS!
AddBookAction Class Path:
ext/ext-ejb/src/com/ext/portlet/library/action/AddBookAction.javaAddBookAction Class Contents:
package com.ext.portlet.library.action;

import javax.portlet.ActionRequest;
import javax.portlet.ActionResponse;
import javax.portlet.PortletConfig;
import javax.portlet.RenderRequest;
import javax.portlet.RenderResponse;

import org.apache.struts.action.ActionForm;
import org.apache.struts.action.ActionForward;
import org.apache.struts.action.ActionMapping;
public class AddBookAction extends PortletAction {
public void processAction(
			ActionMapping mapping, ActionForm form, PortletConfig config,
			ActionRequest req, ActionResponse res)

		throws Exception {

		String bookTitle = req.getParameter("book_title");

		if ( null == bookTitle || "".equals(bookTitle) ) {
			setForward(req, "portlet.ext.library.error");
		} else {
			setForward(req, "portlet.ext.library.success");
		}
	}

	public ActionForward render(ActionMapping mapping, ActionForm form,
		PortletConfig config, RenderRequest req, RenderResponse res)
		throws Exception {
		if (getForward(req) != null && !getForward(req).equals("")) {
			return mapping.findForward(getForward(req));
		} else {
			return mapping.findForward("portlet.ext.library.view");
		}
	}
}
Main code:
String bookTitle = req.getParameter("book_title");

if ( null == bookTitle || "".equals(bookTitle) ) {
	setForward(req, "portlet.ext.library.error");
} else {
	setForward(req, "portlet.ext.library.success");
}
Where does “book_title” come from?
It comes from to the
view.jspform.What is the if/else statement doing?
It is detecting if the book title was submitted.
According to the detected state, it sets the forward path.
Errorforward path:if ( null == bookTitle || "".equals(bookTitle) ) { setForward(req, "portlet.ext.library.error"); } else { setForward(req, "portlet.ext.library.success"); }Successforward path:if ( null == bookTitle || "".equals(bookTitle) ) { setForward(req, "portlet.ext.library.error"); } else { setForward(req, "portlet.ext.library.success"); }ErrorandSuccessforward path is linked to the the path instruts-config.xml:<forward name="portlet.ext.library.error" path="portlet.ext.library.error" /> <forward name="portlet.ext.library.success" path="portlet.ext.library.success" />
Once you have finished modifying all of the files, deploy them to Tomcat.
Open up a cmd prompt.
Click Start>Run and then type cmd.
Navigate to your ext directory and then type ant deploy.
…\ext>ant deploy
Verify that the files were deployed to Tomcat
Go to
…\tomcat\webapps\ROOT\WEB-INFand openportlet-ext.xml,liferay-portlet-ext.xml,struts-config-ext.xml, andtiles-defs-ext.xmland check to see that the files were deployed correctly.Next, go to
…\tomcat\webapps\ROOT\html\portlet\ext\libraryand open upview.jspto see that it was deployed correctly.
Restart Tomcat
Open up a new browser and type:
http://localhost:8080
LOGIN: test@liferay.com
PASSWORD: test
Now that we’ve finished redirecting with an action. Lets make the success page display the submitted value.
Update
success.jspto display the submitted value.
success.jsp Path:
ext-web/docroot/html/portlet/ext/library/success.jsp
success.jsp Contents:
<%@ include file="/html/portlet/ext/library/init.jsp" %>
<%
	String bookTitle = request.getParameter("book_title");
%>
<table align="center" cellspacing="10" cellpadding="3">
<tr>
	<td style="font-weight:bold">Book Title:</td>
	<td><%= bookTitle %></td>
</tr>
</table>
Add
init.jsp<%@ include file="/html/portlet/ext/library/init.jsp" %>
This will give us access to the
init.jsplocated here:…\ext\ext-web\docroot\html\portlet\ext\library\init.jspGet the submitted value
String bookTitle = request.getParameter("book_title");Display the submitted value in
success.jsp<%= bookTitle %>
