Table of Contents
The Journal application is composed of four portlets:
- Journal
Is an administration portlet that allows the creating, updating searching and managing contents
- Journal Articles
Allows displaying of a set of contents that satisfy a set of conditions configured through the portlet preferences such as content type and community.
- Journal Content
Allows displaying one or more contents manually selected from the list of available portelts. If more than one content is selected only one at a time will be shown and links will be added to allow the user to navigate to the rest of the contents.
- Journal Content Search
Allows users to search for Journal content.
the Journal portlet is used to create all CMS content and the Journal Articles and Journal Content portlets are used to display those contents. This portlet allows writers to easily edit content displayed on web pages without having to sort through complex code.
Before getting into the details of how to use the Journal portlet, it is useful to understand structures, templates, and articles; they are the backbone of the Journal portlet's functionality.
Structures define the type and number of content pieces (e.g. text, text area, images, selection lists, etc.)
Templates determine how content pieces will be arranged or laid out
Articles are where each content piece is populated with actual text and images
The point of a structure is to unify journal articles with the same numbers and types of items. For example, a Management Bio section of a website might have ten biographies, each requiring an image for the executive headshot, a text for the headline, and a text area for the main biography. A structure would be created with one image, one text, and one text area, each named accordingly. This allows writers to create the individual bios and other texts without needing to recreate the page structure for each biography.
Designers can create several templates for one structure to allow for a variety of presentations or they can give writers discretion in deciding the best layout.
All specific text and images are entered when a user adds or edits an article. This is also where a user chooses the layout based on the templates affiliated with a structure. Since multiple templates can be associated to a structure, the user can select the template that formats their article the way they want. Though articles normally have an associated structure and template (see SAMPLE-XSL-ARTICLE), it can also be a simple article without any associations (see SAMPLE-SIMPLE-ARTICLE).
Below is an example clarifying the definitions given above:
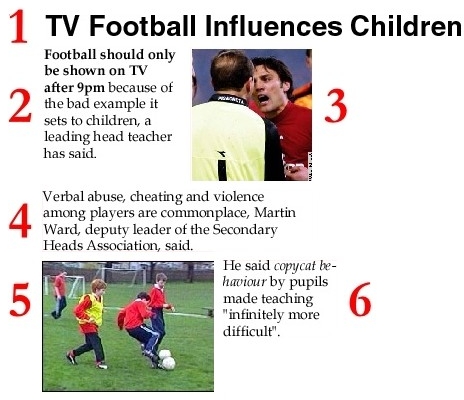
The structure in this case lists out the six content pieces:
One text element named "headline" (1)
Three text area elements named "body-text" (4), "caption-1" (2), and "caption-2" (6)
Two image elements named "image-1" (3) and "image-2" (5)
The XSL template for this example would specify where the headline, text areas, and images should go. It places the captions to the sides of the images. Another template can be made for the same structure that has the captions below the images.
The article is the actual content that uses the template and structure. This particular article is about the alleged effects of professional football broadcasts on the behavior of the children who watch them. Two photos are uploaded and body text and headline are filled in. Another article may be generated using the same template and structure discussing the equipments used for fly fishing.
It should be noted that the proper order for creating an article from start to finish is:
Create the structure to set the fields that content will be entered.
Create the template to associate with the structure to define the layout of the content in question.
Create the article with the hard-coded content that will be displayed on the page, choosing the proper structure and template to be used for the article.